Identify the location of posterior tibialis and cue ankle and foot exercises more effectively with clients. Hopefully, you are doing foot and ankle exercises with clients.
If so, you are awesome! If not, it’s ok – there is always something new to learn. This knowledge supports the function of every exercise your clients do with their feet on the ground.
Posterior Tibialis Anatomy

2014 Books of Discovery
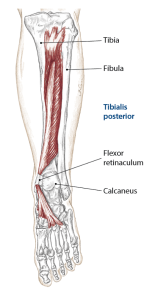
Origin: proximal posterior shafts of the tibia and fibula and interosseous membrane.
Posterior tibialis is deep to soleus and gastrocnemius. If you identify the separation between the right and left gastrocs you can gently sink your fingers in to feel the opening between your tibia and fibula. It may be tender to the touch.
Insertion: all five tarsal bones and the bases of the metatarsals 2-4.
These insertion points are all found within the longitudinal arch of the foot. This is right where an artificial arch support would touch your midfoot. Poke your fingers into your arch slowly until you detect the small tarsal and metatarsal bones.
Posterior tibialis supports your arch naturally, along with other foot muscles like flexor hallucis brevis. Strengthening these muscles is important for maintaining a strong arch and avoiding the need for artificial supports. Shoe inserts have a time and place but more often than not are unnecessary.
The longitudinal arch in your foot is valuable during gait when you push off the ground. You want the arch to be a rigid and strong lever so it can propel your body forward.
Posterior Tibialis Exercise
Have your client seated with the knee of the ankle being worked bent to 45 degrees. Ask him to create the longitudinal arch with his foot by “scooping” the floor. Cue plantarflexion and inversion using the floor as resistance. There doesn’t need to be any visible joint movement. Performing this exercise as an isometric contraction is beneficial.
Anterior and Posterior Tibialis – Synergists and Antagonists

2014 Books of Discovery
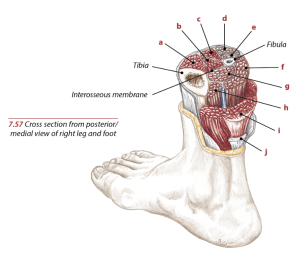
Anterior (a. in cross-section image) and posterior (g. in cross-section image) tibialis are automatically thought of as antagonists because one is on the front lower leg performing dorsiflexion and the other on the back of the lower leg performing plantarflexion.
But, hang on one minute.
Both muscles insert around the medial side of the foot making them both vehicles for foot inversion and synergists. They are also antagonists because anterior tibialis dorsiflexes the ankle and posterior tibialis plantarflexes the ankle.
Muscular function is quite complex when you examine it closely. The same two muscles can be synergists and antagonists to one another. Even the same muscle can be an antagonist and synergist to itself!
Understanding the muscles role in plantar flexion and dorsiflexion as well as how they work with the peroneal muscles is key to programming exercise for the stable base that (should be) your feet.
Posterior Tibialis Study Tip
To remember any muscle better, find the attachment points on yourself. Invert and plantarflex your ankle while placing your hand where the attachment sites are to feel the contraction of the muscles via the tendons. Using a balloon or rubber band is a way to bring the muscle to the outside of the skin so you can better visualize what it doesn’t.
When you’re walking, pay attention to the role that these muscles have in every step you take.
Learning anatomy and muscle attachments enable you as a personal trainer to create effective exercises and cue proper form with your clients. Keeping bodies strong and your business healthy. It’s important to strengthen these muscles with the same emphasis you place on the pectoral group or the abdominals.
Anatomy and biomechanics is a subject that requires lifelong learning. The human body has hundreds of muscles that provide infinite options for locomotion. Be sure to incorporate foot and ankle exercises into your exercise programs. They are important!
[info type=”facebook”]Join the conversation on the NFPT Facebook Community Group.[/info]
References
Abrahams, P.H. et al. 2003. McMinn’s Color Atlas of Human Anatomy. London: Elseiver.
Biel, Andrew. 2014. Trail Guide to the Body revised 5th edition. Colorado: Books of Discovery.
Muscolino, Joseph E. 2004. Musculoskeletal Anatomy Coloring Book. Philadelphia, PA: Mosby, Inc.
Expand your anatomy knowledge further with NFPT’s Fundamentals of Anatomy Program.
Balloons, play-doh, pipe cleaners, and ribbons are used to demonstrate each muscle with its attachment point on a skeleton model in a series of videos. You’re also shown how to find the attachments on yourself and/or clients. Application exercises and guided visualizations are also provided along with a 50-page workbook.
Beverly Hosford, MA teaches anatomy and body awareness using a skeleton named Andy, balloons, play-doh, ribbons, guided visualizations, and corrective exercises. She is an instructor, author, and a business coach for fitness professionals. Learn how to help your clients sleep better with in Bev's NFPT Sleep Coach Program and dive deeper into anatomy in her NFPT Fundamentals of Anatomy Course.


