There are 18 muscles working when we breathe, including the pecs. More often than not, the diaphragm and transverse abdominus are the main two muscles talked about most for breathing. Yet there is so much more happening beneath the skin when you inhale and exhale.
Exploring the muscles of breathing is a great way to strengthen your anatomy knowledge and step up your game as a fitness professional.
What are the muscles that help you breathe?
There are 12 muscles of inhalation and 6 muscles of exhalation. Why are there more muscles for inhalation than exhalation?
- Perhaps it’s because more strength is needed to breathe in than to breathe out?
- Is it because inhaling resists gravity?
- What do you think?
Reference an anatomy book to identify the location and attachments of each muscle listed so you can explore how it facilitates breathing.
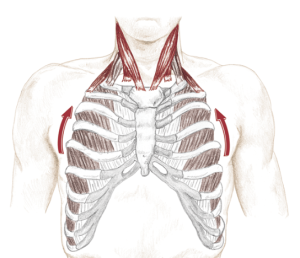
Muscles of Inhalation (12)
With a breath of inhalation, the ribs need to elevate and expand to allow the lungs to fill with air. By studying the muscles and attachments you can see how movers like pec major have a role in breathing.
All of the muscles listed attach from the ribs to another anchoring bone that allows them to literally lift the rib cage. So cool!
Identify the attachments (origin and insertion) of each muscle while you inhale to connect to the muscle and its function.
- Diaphragm
- Anterior scalene – bilaterally, unilateral would cause cervical sidebend
- Middle scalene – bilaterally, unilateral would cause cervical sidebend
- Posterior scalene – bilaterally, unilateral would cause cervical sidebend
- Sternocleidomastoid – assists due to medial attachment
- External intercostal
- Serratus posterior superior – anchoring ribs superior (up) medially to vertebrae
- Quadratus lumborum
- Pectoralis major – assists with arm flexed
- Pectoralis minor – with scapula fixed via rhomboids and trapezius
- Serratus anterior – with scapula fixed via rhomboids and trapezius
- Subclavius

Books of Discovery 2014
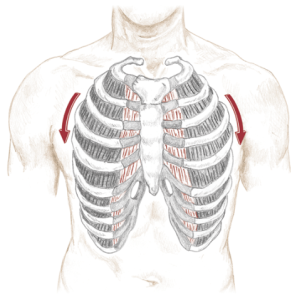
Muscles of Exhalation (6)
During an exhale the ribs need to depress and the organs compress to expel air out of the lungs. Using an anatomy book, identify the attachments (origin and insertion) of each muscle while you inhale to connect to the muscle and its function.
- Internal intercostals
- Serratus posterior inferior – anchoring ribs inferior (down) medially to lumbar vertebrae
- External oblique – by compressing abdominal contents
- Internal oblique – by compressing abdominal contents
- Transverse abdominus – by compressing abdominal contents
- Quadratus lumborum

Books of Discovery 2014
Breathing Exercise
Breathing is a natural process that happens without much thought, yet many people may not breathe to their full potential. “Ideally, the ribs are designed to expand in three directions during inhalation: anterior/posterior, lateral and superior). Yet, for reasons ranging from posture to emotional trauma, few people truly breathe in this manner (Biel, 2014).”
There are many methods to enhance breathing. The first step to better breathing is an assessment.
Breathing Assessment
- Ask your client to breathe fully while you observe their rib cage.
- If the client is comfortable you can ask to place your hands gently on the lateral rib cage to feel what is happening.
- You might close your eyes to experience the movement differently.
- A lot can be observed simply watching as well.
- Observe from the front, back and each side.
- Have the client report what they notice about their body when taking a deep breath.
Note if the ribs:
- Expand in three directions.
- Move together.
- Move equally on the right and left sides.
If anything seems abnormal refer the client to their physician. You might already know if your client has COPD, scoliosis, asthma, or other conditions that affect breathing. In this case, seek recommendations from client’s doctor and educate yourself on appropriate training methods for these conditions before training.
Breath training is a great tool to implement with all clients. Your goal as a personal trainer is to strengthen the torso complex and core. Even if everything seems perfect, try some breath training with the client.
Four Breathing Techniques
There are several goals you might keep in mind when integrating breath training into your workouts.
- Energy – Coach full inhalation breaths and powerful exhales. Incorporate energizing words and arm movements or a yoga flow to integrate the entire body.
- Relaxation – Guide gentle and mindful breathing techniques. Talk your client through long, slow, full breaths by counting and having her place her hands on her ribs to feel what is happening. Use words associated with relaxation such as: let go, relax, melt, etc.
- Stretching – Teach full inhalations with a hold. This can generate a wonderful stretch. Add a gentle torso rotation, side bend, flexion or extension motion to the breath. If there is any discomfort with this or any stretch during exercise, stop and consider referring to a physician.
- Body Awareness – In order to become more aware of each of the 18 breathing muscles to optimally increase strength, a client might need you to show them pictures of each muscle in an anatomy book or help them locate the muscle of themselves. This is something you can learn how to facilitate in NFPT’s Anatomy Fundamentals Course.
Breath training can be added into a workout routine so it doesn’t take up too much extra time. You can focus on breathing at the beginning or end of a session for a few minutes or guide breathing during the exercises you are already teaching. Breathing seems natural and automatic but can benefit from some attention just like the other components of human movement.
References
Biel, Andrew. 2014. Trail Guide to the Body 5th edition. Boulder: Books of Discovery.
Beverly Hosford, MA teaches anatomy and body awareness using a skeleton named Andy, balloons, play-doh, ribbons, guided visualizations, and corrective exercises. She is an instructor, author, and a business coach for fitness professionals. Learn how to help your clients sleep better with in Bev's NFPT Sleep Coach Program and dive deeper into anatomy in her NFPT Fundamentals of Anatomy Course.


